

How to RE-COLORIZE Your Grout to Change its Color and Re-accent Your Space
When it comes to tile installations, grout plays a crucial role in enhancing both the functionality and the aesthetic appeal of the space. Grout is the material used to fill the gaps between tiles, creating a solid surface that is both water-resistant and durable. However, it also plays a significant role in accenting and enhancing […]

When it comes to tile installations, grout plays a crucial role in enhancing both the functionality and the aesthetic appeal of the space. Grout is the material used to fill the gaps between tiles, creating a solid surface that is both water-resistant and durable. However, it also plays a significant role in accenting and enhancing the overall appearance of the tiled space. The color and the style of grout you choose can significantly impact the final look of the surface, creating a cohesive and purposeful design.
In this blog, we will explore the reasons for re-colorizing your grout, how to choose the right grout color, and how grout is re-colorized making the process more understandable, hassle-free and easy. We will also differentiate between PAINTING YOUR GROUT LINEs and properly RE-COLORIZING. One leads to problems, while another adds value.
Why Consider Re-Colorizing Your Grout?
If you want to revamp the appearance of your tiled surfaces, staining your grout may be a simple and affordable solution. Here are some reasons why people choose to stain their grout:
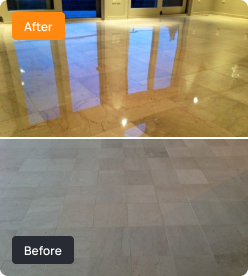
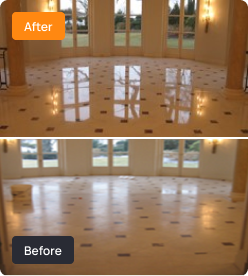
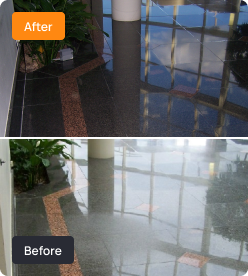
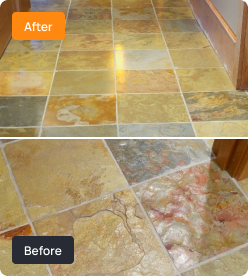
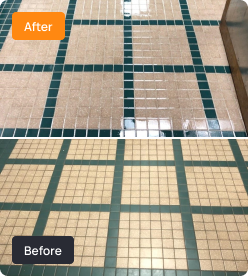
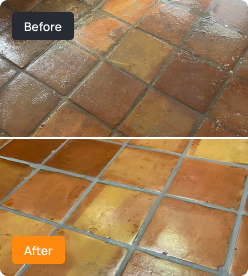
- Restore its Original Color: Grout can become discolored and dirty over time, detracting from the original appearance of your tiles. Stained grout may be difficult to remedy or clean, and if it has stained once will stain again, unless the root cause is addressed. Re-colorizing is one of those rare processes that can accomplish two things at once, addressing the root cause of your grout staining issue while restoring a uniform color to your grout once again for a clean, fresh, and new look again.
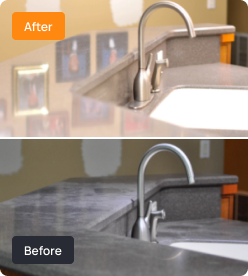
- Change the Look of Your Room: Re-Colorizing your grout to a different color can add more personality, drama, and style to your room. For example, staining white grout to black or brown can create a modern and sophisticated look, or matching the royal blue curtains and towels with a royal blue grout line re-accents the room tiing everything together and making your new color choice POP.
- Protect Your Grout: Re-colorize with the right chemistry product and re-colorizing can eliminate open grout pores preventing re-staining, making cleaning easier, and reducing severity mold and mildew.
- Make Cleaning Easier: Staining the grout with a darker color can make it easier to maintain the look of the titles, making stains and discoloration less visible. This can be especially helpful for areas or spaces prone to spills or messes. Of course, this is a sign that someone gave up, and signals an effort to hide-the-dirt versus conquer the problem. Porous grout leads to dirty-grout-appearances and stained grout, but seal the grout with a non-acid sensitive COLORSEAL product such as MARBLELIFE’s COLORSEAL and one can prevent future grout staining, while still retaining that light color you prefer, and capturing the fresh, easy cleaning re-colorizing with MARBLELIFE COLORSEAL provides.
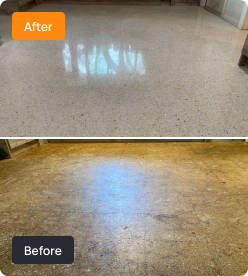
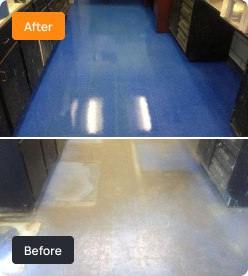
- Add Value to Your Home: Staining your grout is an affordable way to improve the overall look and feel of your home’s bathroom, kitchen, or other tiled areas, increasing its sale value. Take your floor from old, dirty and worn, to clean, fresh and new by addressing that grout stain that is aging your look, and screaming replace-this-floor, when the right MARBLELIFE COLORSEAL color can give you a new floor in hours without dust, delay or cost associated with repalcement.
Types of Grouts
Grout is a construction material used to fill the gaps between tiles, providing stability, support, and protection to the tiled surface. Several types of grouts are available in the market, each with unique properties and applications. Here are some of the most common types of grouts used in construction and home improvement.
- Sanded Grout: Sanded grout is a type of grout that contains large grains of sand, which give it a gritty appearance and texture. The sand is added to the grout to help bond and prevent cracking, making it ideal for grout seams 1/8 inch or wider. However, it is not recommended in thinner seams than 1/8-inch, as the sand particles can fill too much width and weaken the structure. One of the benefits of sanded grout is that it shrinks insignificantly as it dries, which helps maintain its integrity over time.
- Unsanded Grout: Unsanded grout, also known as non-sanded grout or wall grout, is a type of grout that contains very fine mineral particles. Unlike sanded grout, it has no noticeable grit and a smoother texture. It works best for narrow seams that are 1/16-inch to 1/8-inch wide. However, it is not recommended for use in seams wider than 1/8-inch, as unsanded grout tends to crack when used in larger seams. One of the drawbacks of unsanded grout is that it shrinks noticeably as it dries, which can affect its durability over time. Unsanded grout is very popular with soffter stones such as marble, travertine and limestone as the sand in sanded grout can scratch the surface when it comes loose and is then caught underfoot as one walks across the floor. Colorseal treatments can also help stabilize sanded grout surfaces. Not all Colorseal systems and certainly paints will bond well to non-sanded grout surfaces, making the Colorseal chemistry an important factor.
- Epoxy Grout: Epoxy grout is a type of grout that is waterproof and less porous than cementitious grout. It works well for seams wider than 1/8-inch, making it ideal for larger projects. Unlike other grouts, epoxy grout does not need to be sealed, as it is naturally resistant to water and stains. Additionally, epoxy grout is highly durable and resistant to cracking, making it a popular choice for high-traffic areas such as kitchens and bathrooms. However, epoxy grout is also more difficult to work with than other grouts, requiring a different application process. That said, epoxy grout can absorb stain materials as well, and as such remains a candidate for COLORSEAL treatment when this occurs, but this generally takes more time with an epoxy grouted floor. That does not mean, that a style change is not desired from time to time.
How to Choose the Right Grout Color?
- Choosing the right grout color is essential to achieve the desired look for your tiled space. Here are some tips on how to select the right grout color:
- Considering the color of your tile while choosing a grout color is essential, as the grout should complement or contrast the tiles.
- Think about the style of your space and choose a grout color that fits the overall aesthetic and color theme.
- Keep maintenance in mind and choose a grout color that will be easy to clean and not show stains easily.
- Test out the grout color options by placing a sample next to your tile where it will be installed to have an idea of the final result.
Consider other factors, such as the size and spacing of your tiles, the lighting in the room, and the level of maintenance and cleaning you are willing to put in while selecting the grout color.
- If you have larger tiles with wide spacing, choosing a darker grout color can help create a more dramatic effect and hide imperfections or irregularities.
- If you have small tiles with narrow spacing, a lighter grout color can create a more seamless and cohesive look.
- If your space has limited natural light, choosing a light-colored grout can help brighten the room, while a dark-colored grout can add warmth and coziness to a well-lit space.
- If you are still confused and cannot choose the correct grout color, choosing neutral-colored grouts is always the best and safest choice. The shades of tan, beige, or gray will never disappoint.
Guide to Re-Coloring Grout
Cleaning the surface to remove surface dirt, as well as dirt engrained in open pores becomes step 1. If the grout has been sealed when installed or since, the seal needs to be backed out in order for the grout to properly accept the new colorseal material. A suitable long-term colorseal with acid resistance should be selected, else acid containing lemon-fresh or vinegar infused cleaners may damage your new grout color surface, just as they likely removed the seal from your original grout surface. Applying the colorseal to the grout without leaving excess on tile shoulders or surface is that next task. Once done one should have a uniform color throughout. If color is not yet uniform you may have to re-apply in those areas to ensure any grout porosity has been addresed.
This can be a quick and easy process, or a nightmare. Fail to properly clean the surface and the existing dirt, wax or build-up will repel the new colorseal from forming a long-term bond to the surface. Fail to remove any prior seals used to seal the grout and the color can be repelled in some areas resulting in a mix of colors and a bigger project. Colorizing 1 tile and colorizing an entire floor can be back-breaking work on your hands and knees, suitable for some, but not for all. Select the wrong material and your cleaner may begin to remove the color after it has been applied. Understanding how to deliver the material to the target grout surface without getting material on the tile shoulder or surface requires a little technique and understanding of the product once again. Simple in theory, but when factoring all the dos and don’t to a successful job, many will opt to use a company with experience cleaning, prepping the floor, and selecting the right product to assure a look that you will be pleased with and will last as long as you are in your home.
When selecting a contractor, avoid contractors that speak of “painting youru grout,” or fail to address pre-cleaning, or how to remove the last vestiges of any sealer that would block acceptance of the new colors. Experienced contractors can point to decades of successful applications in residential and commercial environments, if they are applying a quality product.
A knowledgeable contractor can make this a painless process, completing a bathroom or kitchen in less than a day, and allowing you to use the surface on completion.
In fact, for older ceramic tiles these surfaces can also be reglazed to complete the restoration process. For marble, limestone and travertine surfaces, these tiles can be repolished to restore a flawless new appearance here as well. It is important to review the process that will be required.
Conclusion
Are you tired of looking at stained, discolored grout? Let MARBLELIFE be your savior! Our expert team of tile and grout specialists has adequate knowledge and accurate tools to make your grout look brand new again.
Is staining your grout the right option for you? Confused? No problem! We also offer free consultations to help you determine the best course of action for your tile and grout needs. We have a range of grout care products and services to help you take good care of your grout for years.
When you choose MARBLELIFE for staining your grout, we will take care of everything. We will clean your tile, advise whether you need to replace your grout or if staining is all you need, and stain your grout to your desired color.
So, why settle for dingy, discolored grout any longer when MARBLELIFE can help you achieve the look you want?
Contact us today to schedule your grout staining and experience the MARBLELIFE difference!
Frequently Asked Questions
- What is grout staining and why is it important?
Grout staining is the process of changing the color of the grout by applying a stain to it. People stain their grout to update the look of their tiled surfaces, hide stains or discoloration, or give their space a fresh & new look.
- Is staining grout a good idea?
Staining grout can give new life to discolored grout and change the look of your tiles. Grout stain is formulated to penetrate and permanently color grout, providing a protective layer that prevents future staining and discoloration. Overall, staining grout is an excellent option for refreshing the appearance of old, stained grout.
- Does grout pens work?
Grout pens are an easy solution for touching up discolored or stained grout. While they may be effective for minor touch-ups, they are not the best solution for larger areas or more significant discoloration issues. Additionally, most grout pens do not include a sealer, essential for a long-lasting grout staining effect. Without a sealer, the grout is more susceptible to future staining and discoloration.
If you are considering staining grout, it is recommended to use bottled stain and sealer for a more comprehensive and long-lasting solution.
- What are the benefits of staining grout instead of re-grouting?
Here is why staining grout is a better option than re-grouting –
- Staining grout is more affordable than re-grouting.
- Staining grout is less time-consuming than re-grouting.
- Staining grout allows you to change the color of your grout without replacing your existing tiles.
- Staining grout is a cleaner and less disruptive process than re-grouting.
- Staining grout is a cost-effective solution for updating the look of your tiles.
- What are the steps for staining grout?
The steps for staining grout are as follows:
- Clean the grout thoroughly and let it dry completely.
- Use a small brush or sponge to apply the grout stain.
- By using a damp cloth, wipe off any excess stain.
- Let the stain dry completely before applying a sealant.
- Can white grout be stained to a darker color?
Yes, of course. White-colored grout can be stained with a darker tinted grout stain for a fresh look. However, ordering a stain sample is recommended to ensure the new color complements the color of the interior. By testing a small area with the new stain, you can better understand the result before staining the entire grout.
- How long do grout stains last?
Grout stain can be an effective solution for enhancing the look of discolored or stained grout, but it is important to note that it may fade over time, particularly in high-traffic areas. However, with a quality product and a proper application, grout stain can last up to 15 years. Regular cleaning and maintenance can also help prolong the life of the grout stain.
- How to maintain stained grout?
To maintain stained grout, follow these simple yet effective tips –
- Use a mild cleaner for regular grout cleaning.
- Avoid using abrasive grout cleaners.
- Apply a new coat of sealant every few years to protect the stain and keep it looking fresh.
- Clean the spills and stains quickly to prevent them from setting in.
- Use a grout or old toothbrush to scrub away dirt or grime.
- Avoid using bleach or vinegar-based cleaners as they can break down the sealant and fade the stain.
- Consider using a color-enhancing grout sealer to help bring out the color and protect the stain.
- Can grout be stained over existing stains or sealers?
No, removing the existing stains or sealers before staining the grout is necessary. Use a grout cleaner or stripper to remove old stains or sealers before applying the new stain.
- How long does it take to stain grout?
The time it takes to stain grout will depend on the size of the tiled surface where the staining will be done. In general, the staining process takes only a few hours.